Installation Guide for Linux Mint 17 / Ubuntu 14 04 on Mac mini late 2012

Installing Ubuntu 14.04 based distribution on a Mac (or any EFI based computer) has become very straightforward. If you read my previous guide on getting Ubuntu installed on Mac mini guide and thought it was long and too many things to configure, relax because you only have to run few commands with the latest Ubuntu 14.04 / Linux mint 17 distributions.

Firstly, remember that you can either split your Mac partitions using DiskUtil and have a separate partitions for your Linux or you can wipe the whole disk and have just Linux on your Mac. If you choose to go with the first, then make a partition on your Mac, of at least 10GB for Linux. And remember how much disk space you allocated for this partition as in the Ubuntu/Mint setup, you will have to point to this specific partition.

Make a bootable USB of Ubuntu 14.04 or Mint 17 (Qiana), you can easily do this by following these instructions (on your Mac).

1. Download the ISO from either Ubuntu or Linux Mint website (make sure you get the 64bit version).

2. Make sure the ISO file copied into your home directory of your Mac with the name linux.iso

3. Then run “hdiutil convert -format UDRW -o ~/linux.img ~/linux.iso” without quotes. This will take a minute or two.

4. If the output file is called “linux.img.dmg” then rename it to “linux.img”

5. Plug your USB of at least 2GB, some old USBs won’t boot so if this guide doesn’t work for your try it with a different USB.

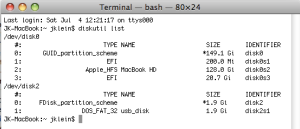
6. Run “diskutil list” without quotes and check the output, should look like the following example. You should be able to distinguish your USB device from your hard drive because of the size, type name (it says usb_disk).

macusb2

7. Now we gotta unmount the USB disk using this command before writing the image file we created in Step 3. Run “diskutil unmountDisk /dev/diskN“, where is the USB device number from the above list. As per the above example it would be 2 so command would be “diskutil unmountDisk /dev/disk2″, make sure you get yours right!

8. Making the bootable USB is easy, run “sudo dd if=~/linux.img of=/dev/rdiskN bs=1m”, again is the USB device number as per Step 6.

This step will take a while, have a coffee and come back.

9. Then you gotta eject the USB, don’t just pull it out. run “diskutil eject /dev/diskN“, again N is the USB device number you used in the above steps. Wait 5secs and then pull the USB out.

10. Reboot your Mac. Keep press “Option / alt” button when you hear the boot sound.

11. You should end up with a password screen where you need to enter your Admin password.

12. You will end up in the bootloader screen of the Mac, now plug in your bootable USB. And press Enter.

13. Continue as per normal Ubuntu / Linux mint installation except the partitions section where you should have a partition for EFI boot partition. So if you choose to have both Mac and Linux you can just split the partition you created in the first steps of this guide to two, for an example one “swap” (of at least 1 to 8GB, or whatever suits you) partition and one “/” (root) partition. And leave the boot loader installation device as as it is (bottom dropdown in partition management section).

If you choose to wipe the whole Mac, I recommend you should chose “Erase disk and install Linux Mint” / “Ubuntu” in the partition management section and leave LVM un-ticked.

14. After finishing the installation process it will ask to reboot, but DONT! get a terminal and run the following commands to make sure that GRUB is the preferred bootloader on your Mac (this overrides your Macs original bootloader sequence but your can revert it back when you want to so don’t panic).

You should also make sure the USB is still plugged into your Mac.

run “sudo apt-get install efibootmgr

then

sudo efibootmgr“, this will list something like the below example output

Mint is at address “Boot0000”

Ubuntu is at address “Boot0010”

Mac OS is at address “Boot0080”

above are the EFI identifiers of my mac, yours will look similar what you need to do now is alter the boot sequence.

I ran the following command, which changed my Mac boot sequence to boot Mint first then Ubuntu (which is just a phantom EFI identifier I assume), lastly the Mac’s original.

sudo efibootmgr -o 0, 10, 80

then just to confirm that above command altered the sequence run “sudo efibootmgr” again and confirm the new order.

15. Reboot using the menu in Mint/Ubuntu. Unplug the USB.

16. You should come back to Mint/Ubuntu, then you gotta fix your wireless networking if required. Make sure the USB is pugged back in then press the “Super” (Command key or Windows key) key and type “Driver manager“, press enter. You should end up in a screen like below.

Choose the Airport Extreme driver and apply.

AirportExtreme

Enjoy!


OPTIONAL:

Low colour depth in the second monitor

If you have a dual monitor setup, they you will notice that sometimes one of the monitors display less colours than the other one. I read somewhere that this issue happens in EFI based machines with Intel HD xxxx video cards, but I am not exactly sure the reason behind it.

The permanent fix for this would be to alter a configuration register for the Intel HD video card. The way I prefer for this is through the /etc/profile file.

1
sudo gedit /etc/profile

Add the following line

1
intel_reg_write 0x70008 0xC4002000

Save the file and exit. In the next boot colours will be normal on both monitors.


Installation Guide for Linux Mint / Ubuntu on Apple Mac mini (late 2012)

UPDATE (29-07-2014) : If you want to install Ubuntu 14.04 or Linux Mint 17 or newer version Please refer to https://theredblacktree.wordpress.com/2014/07/29/installation-guide-for-linux-mint-17-ubuntu-14-04-on-apple-mac-mini-late-2012/

UPDATE (11-06-2014):  As of Ubuntu version 14.04, Ubuntu installer supports Macs without going through the following guide. Download the compatible Mac ISO image from Ubuntu site before proceeding.

UPDATE (11-01-2014): I removed Mint and Ubuntu versions used in the title of the article assuming that all Ubuntu based distros will be almost identical in terms of installation and initial configuration steps. I personally upgraded Mint 15 to 16 following the same steps and worked.


Getting Linux to run on Apple hardware has always been tricky, so if you get lost somewhere in the middle of the process of configuring or installing Linux, please drop a comment and I would reply as soon as possible, probably within hours.

Installing Ubuntu/Linux Mint on Macmini is easy, but getting it to work the way you normally want a PC to run is a bit difficult (meaning, run smoothly and making all peripherals work) :) I am trying to cover all the issues I had with linux installation process and getting Apple hardware to run happily with Linux.

Few things before we start,

  • I assume that you have a reasonable knowledge in *nix based OSes and commands.
  • You need a stable power supply ;)
  • A Mac mini late 2012 with OSX in a perfect state (if not you can reinstall OSX to start with, I did that)
  • A keyboard and mice
  • A monitor or two so you can see whats going on :)

NOTE: I reinstalled macosx before installing Linux and recreated the partitions table with two (using apple disk utility), since I had a 1TB drive, I split it into two equal partitions and reinstalled mac on the first (512GB was used).
I left the second partition untouched, meaning unformatted. I dont think this is a must but just saying what my configuration was…

Intro
Macmini comes with an UEFI bootloader, the easiest way to get multiple OSs to run with the machine is through rEFInd, you can download it from the link below.
As far as I can see rEFInd is a software layer for UEFI based computers so that you can esily run multiple OSes with a nice menu driven interface so that users can switch between them easily.
Download the “Binary zip file” from the link below.

After downloading, extract the zip, ‘cd’ into the folder and run “sudo ./install.sh”
it will show some messages and install the complete installation.

Reboot, if rEFInd is installed correcty you will see the menu at the time of booting…

(ver 0.7.4 as of 05-Sep-2013, Binary zip archive)
http://www.rodsbooks.com/refind/getting.html
http://sourceforge.net/projects/refind/files/0.7.4/refind-bin-0.7.4.zip/download

Installation process
The installation should be straightforward until you get to the point where you choose the paritions setup. You need to choose “Something else” from the harddisk setup/partition section, then in the partition editor
chose the 2nd partition you left blank in the mac disk partitioning utility (check the note above), use the blank partition to setup your favourite partition table.

A video clip explaining manual disk partitioning in Mint.

http://www.youtube.com/watch?v=eWXtVkA-S6g

In the “Device for bootloader installation” dropdown please select the root partition or /boot/ partition you created in the partition table. Never use any of the block devices used by the Mac OSX, in mine they were the device itself /dev/sda and /dev/sda1, /dev/sda2

Once the partitions are confirmed and the bootloader installation device is set, proceed with the installation.

If you need more detailed guide for partitioning and installation guide please refer to http://www.maclife.com/article/howtos/install_linux_your_mac

NOTE: I noticed this when I was upgrading my MacMini from Mint 15 to 16, the package grub2-amd64-signed fails if the computer doesn’t have access to Internet (I assume this has something to do with GPG package signing).

Low colour depth in the second monitor

If you have a dual monitor setup, they you will notice that sometimes one of the monitors display less colours than the other one. I read somewhere that this issue happens in EFI based machines with Intel HD xxxx video cards, but I am not exactly sure the reason behind it.

The permanent fix for this would be to alter a configuration register for the Intel HD video card. The way I prefer for this is through the /etc/profile file.

sudo gedit /etc/profile

Add the following line 

intel_reg_write 0x70008 0xC4002000

Save the file and exit. In the next boot colours will be normal on monitors.

Broadcom wireless BCM4331 chipset

Broadcom chips are not supported well with linux, if you need more information about why the Arch linux documentation provides a good inside (https://wiki.archlinux.org/index.php/Broadcom_wireless).

Lets get the wifi driver installed,

You need to make sure that repository sources are set to download and compile drivers from the source package itself, inorder to enable source code repositories refer to https://help.ubuntu.com/community/Repositories/Ubuntu#Adding_Ubuntu_Software_Repositories, usually in linux mint/ubuntu in “Software sources” application should have a option to enable “source code” option.

After enabling source packages open up a terminal and run following commands, in order to compile a package from the source, you need kernel headers and debian package developer tools.

sudo apt-get update
sudo apt-get install linux-headers-generic linux-headers-`uname -r`
sudo apt-get install dpkg-dev debhelper dh-modaliases
sudo apt-get install --reinstall bcmwl-kernel-source

And make sure the opensource drivers are disabled, in order to disable them edit the kernel modules config file and make required changes as follows

sudo gedit /etc/modprobe.d/blacklist.conf

add following lines to the bottom of the file

blacklist bcm43xx
blacklist b43
blacklist bcma

Reboot the machine and wireless should be up and running..! ;)

Suspend to ram (S3)

If you really don’t care about suspending your mac mini reliably so that you can save trees ;) and got wireless working perfectly, you can skip this section. If you need to get both suspend and wifi working, continue.

In latest ubuntu release the kernel 3.8.xx does not reliably able to put Mac mini to sleep, I couldn’t figure out the exact reason but, after lot of trial and error I figured out that kernel-3.11.xx can reliable suspend Mac mini.

But the drawback with installing the latest kernel is that wifi driver stops compiling as per the kernel header changes in the kernel-3.10.0.

If you follow the guide to the letter you should be able to apply the patch I have submitted to the bcm-kernel-source package and get it to compile and install correctly.

Step 1: Create a temp directory to get download and run kernel updates.

mkdir /tmp/kernel-3.11.0
cd /tmp/kernel-3.11.0

Step 2: Get the kernel packages as per your processor architecture from the link below. You should download THREE packages from the link linux-headers-generic, linux-headers, linux-image. Since all latest mac mini run Core iX processors you can safely download 64bit packages.

wget http://kernel.ubuntu.com/~kernel-ppa/mainline/v3.11-saucy/linux-headers-3.11.0-031100-generic_3.11.0-031100.201309021735_amd64.deb http://kernel.ubuntu.com/~kernel-ppa/mainline/v3.11-saucy/linux-headers-3.11.0-031100_3.11.0-031100.201309021735_all.deb http://kernel.ubuntu.com/~kernel-ppa/mainline/v3.11-saucy/linux-image-3.11.0-031100-generic_3.11.0-031100.201309021735_amd64.deb
sudo dpkg -i *.deb

Step 3: Error messages and the fix

At the time of writing bcmwl-kernel-source didn’t compile using kernel-hearders 3.11.0 and get the error mentioned in the below paragraph, and I have submitted a patch in the ubuntu launchpad. You can check the status of the package in the URL at the end of the document, if it says the package is updated, you don’t have to worry about running any of the below commands.

After running dpkg command you may see an error which says check make.log for debug information, that means the wireless driver failed to compile and install correctly. But dont worry just restart your computer so that the next time computer will boot up with the latest kernel we just installed. Please note that the wireless will not work after the reboot (this is due to the wl.ko kernel module error we got), so make sure you got another device with this tutorial open so you can continue reading.

After restarting, download the patch I have attached in the launchpad bug report and copy it to the bcmwl-kernel-source directory as follows and recompile the code.

cd /usr/src/bcmwl-6.20.155.1+bdcom/patches
wget https://bugs.launchpad.net/ubuntu/+source/bcmwl/+bug/1197586/+attachment/3808355/+files/0008-add-support-to-linux-3.9.0-3.11.0.patch
cd /usr/src/bcmwl-6.20.155.1+bdcom/
sudo gedit dkms.conf

After editing dkms.conf you will see 10-15 lines as follows and add the line into the file and save.

PACKAGE_NAME="bcmwl"
PACKAGE_VERSION="6.20.155.1+bdcom"
CLEAN="rm -f *.*o"
BUILT_MODULE_NAME[0]="wl"
MAKE[0]="make -C $kernel_source_dir M=$dkms_tree/$PACKAGE_NAME/$PACKAGE_VERSION/build"
DEST_MODULE_LOCATION[0]="/updates"
PATCH[0]="0001-MODULE_LICENSE.patch"
PATCH[1]="0002-Makefile.patch"
PATCH[2]="0003-Make-up-for-missing-init_MUTEX.patch"
PATCH[3]="0004-Add-support-for-Linux-3.2.patch"
PATCH[4]="0005-add-support-for-linux-3.4.0.patch"
PATCH[5]="0006-add-support-for-linux-3.8.0.patch"
PATCH[6]="0007-nl80211-move-scan-API-to-wdev.patch"
PATCH[7]="0008-add-support-to-linux-3.9.0-3.11.0.patch" <-- Line we need to add
#PATCH_MATCH[3]="^3.[23456]"
#PATCH_MATCH[4]="^3.[56]"
AUTOINSTALL="yes"

Step 4: Reconfigure bcmwl-kernel-source

If you have done all the above steps correctly, you should be able to run the following command and recompile the bcmwl driver without compile time errors.

sudo dpkg-reconfigure bcmwl-kernel-source

Step 5: Check if the driver is installed

cd /lib/modules/3.11.0-031100-generic/kernel/drivers/net/wireless
ls -l

You should see a file called wl.ko, thats it!

Reboot your machine and wireless should come up. You can try to load the kernel module by running “sudo modprobe wl” in the terminal as well without getting module not found errors.

If anyone is interested this is the bug that we just fixed https://bugs.launchpad.net/ubuntu/+source/bcmwl/+bug/1197586

These are all the problems I experienced while using Linux with my Mac mini in the first two weeks, and hope this document would help one of you brave linux users to run your favourite distro on one of the best hardware provided by Apple :)

Drop a comment if you found any other issues with Mac minis and Linux, I am happy to help.